


This post is a part of Azure Spring Clean which is a community event focused on Azure management topics from March 22-25, 2021. Thanks to Joe Carlyle and Thomas Thornton for putting in the time and organizing this event. From a participants perspective it’s been enjoyable to contribute. This topic specifically outlines how to use Azure Automation Runbooks to control access and costs within Azure.
With the vast array of Azure services that can be created on demand comes the struggle with how to manage and provision sandbox or experimentation resources within an organization. The struggle here is both from terms of granting just enough access to provide developers with the freedom to experiment while also being fiscally responsible.
What this approach proposes provides developers with the ability to create Resource Group(s) where they are given owner access within the scope of the Resource Group(s). This is accomplished by leveraging an Azure Runbook to create and then an additional Azure Runbook that is responsible for deleting the Resource Group after a given duration, thus limiting any potential financial impact.
Full disclosure the concept isn’t 100% my own original idea rather was something I have come across and expanded as needed to fit within a desired organization’s requirements.
The Automation Account will provision a Resource Group, assign appropriate tags, apply desired naming convention, and provision the requesting individual with owner access to the Resource Group. This will accomplish the first piece of granting developers flexibility in what they can create and manage with in Azure.
The second piece is an additional Runbook which will run every day and check to see if the Resource Group has expired. Expiration in this instance is a set number of days since creation of the Resource Group. If the Resource Group has expired then the Runbook will delete the Resource Group. This accomplishes the second piece to the puzzle and helps control costs within Azure.
If you aren’t familiar with Azure Automation Accounts and Azure Runbooks it helps to think of them as a way to run an automated script or task within a given Azure subscription. The Automation Account is the account/environment the script (known as a Runbook) will run within. After having both an Automation Account and a Runbook created one may create a schedule which can be assigned to one or multiple Runbooks to automate execution. Alternatively, Runbooks can be ran on demand as well, which is what we want when creating the Runbook for creation of the Resource Group.
All of the following steps were performed in a standard MSDN Visual Studio Azure Subscription. If you don’t have access to one then you can still follow along with an Azure subscription in which you have at least contributor access as well as an associated Azure Active Directory (Azure AD) tenant where you must have the ability to grant applications Azure AD access. Don’t worry, I’ll include the necessary code at the end of this article.
Setup
The first step in this process is to create an Azure Automation account like below:

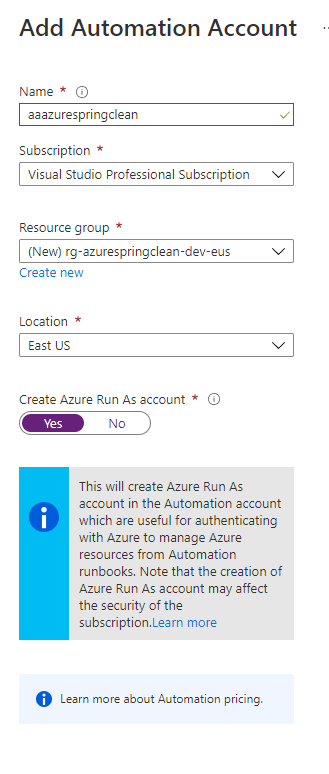
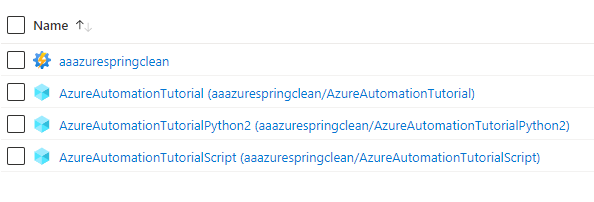
Be sure to have the Run As Account set to “Yes”. We will need this account as it will require additional access later on. After creation we should see our Automation Account and a set of three sample Runbooks which Microsoft gives you to get started:

Before creating the Runbook we need to install a couple PowerShell modules that our script will be leveraging. To do this select the Automation Account -> Modules Gallery, select the specified module and select “Import”. This is the list of modules that we will be using:
- Az.Accounts
- Az.Monitor
- Az.Resources
- AzureAD
Any users who will need to run this Runbook should have at least “Automation Operator” privilege. This will allow them to execute the Runbook when necessary.
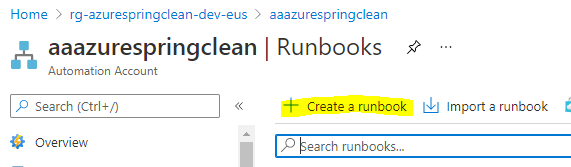
Part One
Now that the Automation Account has been created, we need to create the Runbook to execute our script for creating the Resource Group and assigning permissions.

For this exercise we will select PowerShell for the Runbook type:


We should now have a blank window to write the PowerShell script in. The first step for creating a sandbox Resource Group is asking what the name or at least the base name of the Resource Group will be. That is setup by declaring the parameter like below.
param
(
  [Parameter (Mandatory= $true)]
  [String] $resourceGroupName
)
The next thing that we need to do with the Runbook is log into Azure using the Automation Account’s Run As Account via PowerShell. This can be accomplished via the Connect-AzAccount command. It will be something similar to:
$connection = Get-AutomationConnection -Name AzureRunAsConnection
$logonAttempt = 0
while(!($connectionResult) -and ($logonAttempt -le 10))
{
    try{
    $LogonAttempt++
    # Logging in to Azure...
    $connectionResult = Connect-AzAccount `
                            -ServicePrincipal `
                            -Tenant $connection.TenantID `
                            -ApplicationId $connection.ApplicationID  `
                            -CertificateThumbprint $connection.CertificateThumbprint

    Start-Sleep -Seconds 30
Write-Output 'Connected to Azure'
    }
    catch {
        Write-Output 'Unable to connect to Azure'
    }
}
Now that we are connected to Azure let’s setup some variables
$destroyByDate = (Get-Date).AddDays(7).ToString('MM-dd-yyyy')
$formatedrgName = "rg-$resourceGroupName-sb-eus"
destroyByDate: Customizable but will be the date the Resource Group will be destroyed on
formatedrgName = Formatting the resource group to adhere to common naming standard
These variables pertain to what we will be creating. The next set of variables are needed to retrieve the user who kicked off the job. This is a bit trickier as the ID isn’t available in the Job meta data so we need to take the Runbook execution’s JobId and look it up in the Azure Activity Log and find who initiated the request.
$automationAccountResourceGroupName = "rg-azurespringclean-dev-eus"
$jobId = $PsPrivateMetadata.JobId.Guid
# Get jobs created in last 30 minutes
$StartTime = (Get-Date).AddMinutes(-30)automationAccountResourceGroupName: Help scope our Activity Log query to just events within the Automation Account Resource Group
jobId: Unique Id of the job
StartTime: Help filter our Azure Log query
Here’s the loop used to grab the Activity Logs in the Resource Group and compare the jobId from the Runbook to the jobId within the properties of the Azure Activity Log.
While ((-Not $requestedBy) -and ($TimeoutLoop -lt 8) ) {
    $TimeoutLoop++
    $JobAcvitityLogs = Get-AzLog -ResourceGroupName $automationAccountResourceGroupName -StartTime $StartTime `
    | Where-Object {$_.Authorization.Action -eq "Microsoft.Automation/automationAccounts/jobs/write"}

    # Find caller for job
    foreach ($Log in $JobAcvitityLogs)
    {
        # Get job resource
        $JobResource = Get-AzResource -ResourceId $Log.ResourceId
        if ($JobResource.Properties.jobId -eq $jobId)
        {

                $requestedBy = $log.Caller
                break
        }
    }
    if ($JobInfo.Count -eq 0)
    {
        Start-Sleep 30
    }
}
So now we have the name of the Resource Group we will create stored in $formatedrgName, the user name of who called the Runbook in $requestedBy, and when we will want to destroy the resource group via $destroyByDate. Let’s take some of that information and store it in tags with some additional information so we know it is in fact a sandbox.
$tags = @{"Customer"="AzureSpringClean";"DestroyBy"=$destroyByDate; "RequestedBy" = $requestedBy; "Environment" = "Sandbox"}So now that we have this information the next step is easy, creating the Resource Group via Powershell.
New-AzResourceGroup -Name $formatedrgName -Location "East US" -Tag $tags -Force
while (($CheckResourceGroupExists -le 5) -and ( -Not $NotPresent))
{
try{
    $NotPresent =$null
    $CheckResourceGroupExists ++

Write-Output "Start to check if Resource group '$($formatedrgName)' exists..."
$newResourceGroup = Get-AzResourceGroup -Name $formatedrgName -ErrorVariable NotPresent -ErrorAction SilentlyContinue
if ($NotPresent) {
    Write-Output "Resource group with name '$($formatedrgName)' does not exist."
    Start-Sleep -Seconds 30

} else {
    Write-Output "Found Resource group with name '$($formatedrgName)'."
    $NotPresent = "false"
}
}
catch {
        Write-Output 'Unable to Locate Resource Group'
    }
}
Notice we have a loop to make sure our Resource Group gets created. This is a good idea to make sure the Resource Group exists before assigning the Owner permission for the individual who requested this new Resource Group.
To do this, the Automation Account has to have access to create RBAC role assignments in the Azure subscription. To enable this the Automation Account needs to be added to the User Access Administer role . This can be done by going to Subscription->Access Control (IAM)->Add Role Assignment-> Search for User Access Adminstrator->and select the Run As Account.
Unfortunately, assigning the user permissions to the new Resource Group isn’t as straight forward as adding the username the role to the group. That is because the New-AzRoleAssignment command requires the AD Object ID, not the username…..Don’t worry there is a solution to this. It just requires an extra step and an extra set of permissions.
The Automation Account needs to run the Get-AzureADUser command while passing in the $requestedBy value. This will return the AD Object ID of our user, which we then can pass into the AzRoleAssignment command.
In order to query Azure Active Directory we need to add the Automation Account to the Directory Readers role in Azure AD. This can be done by going to Azure Active Directory->Roles and administrators->search Directory readers->Add Assignment.
Once we have this then we will need to log into Azure AD (Connect-AzureAD command vs pervious Connect-AzAccount command), get the user’s object ID, and then run the New-AzRoleAssignment command passing in the user’s object ID, the desired resource group we are assigning access too, and the role we want to assign.
while(!($connectionResultAD) -and ($logonAttemptAD -le 10))
{
try{
$LogonAttemptAD++
# Logging in to Azure AD...
$connectionResultAD = Connect-AzureAD `
-Tenant $connection.TenantID `
-ApplicationId $connection.ApplicationID `
-CertificateThumbprint $connection.CertificateThumbprint `
-ErrorAction Stop
Start-Sleep -Seconds 30
Write-Output 'Connected to Azure AD'
}
catch {
$_.Exception.Message
Write-Output 'Unable to connect to Azure AD'
}
}
if ($NotPresent = "false"){
Write-Output 'Attempting to Assign Permissions'
try{
Write-Output "Attempt to get Object ID"
$requestedByADObject = Get-AzureADUser -ObjectId $requestedBy -ErrorAction Stop
Write-Output $requestedByADObject
New-AzRoleAssignment -ResourceGroupName $formatedrgName -ObjectId $requestedByADObject.ObjectId -RoleDefinitionName Owner
Write-Output 'Successfully Assigned Permissions'
}
catch{
$_.Exception.Message
Write-Output 'Unable to Assign Permissions'
break
}
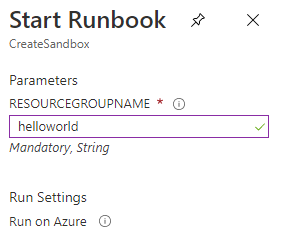
}Hit the ‘Publish’ button and we are ready to run!
After hitting start we should see a dialog prompting us for the name we want to give to our Resource Group

The Runbook should show a status of “Queued” and then “Running” don’t be alarmed if it takes a few seconds to minutes for the Runbook to start executing.
We should start to see in the output first the creation of our Resource Group :

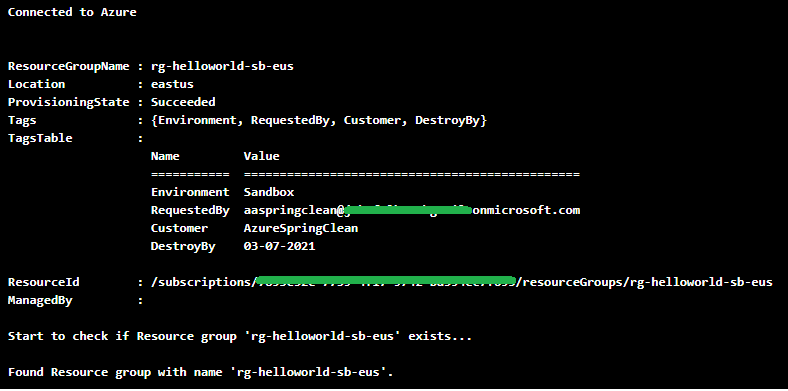
Followed by the output of our role assignment.
We can confirm that the permissions were correctly assigned by checking the portal. Locate the Resource Group -> Access control (IAM) -> Role


In this case the user aaspringclean who has Reader permissions inherited from the subscription has been given Owner over the specific Resource Group.
Part Two
Now that our Automation Account can create Resource Groups, we need a way to clean up Resource Groups after they have expired. This process isn’t as complicated as the Runbook to create the resource group.
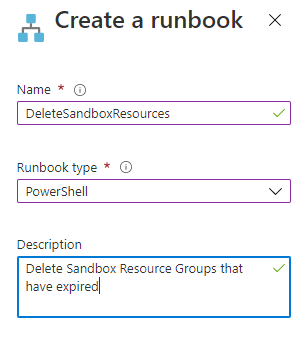
The first step is creating the DeleteSandboxResources Runbook just like the Create Sandboxes Runbook we will select PowerShell for the type:

Then we will repeat the same code used in the CreateSandbox Runbook for logging into Azure:
$connection = Get-AutomationConnection -Name AzureRunAsConnection
$logonAttempt = 0
while(!($connectionResult) -and ($logonAttempt -le 10))
{
    try{
    $LogonAttempt++
    # Logging in to Azure...
    $connectionResult = Connect-AzAccount `
                            -ServicePrincipal `
                            -Tenant $connection.TenantID `
                            -ApplicationId $connection.ApplicationID'
                            -CertificateThumbprint $connection.CertificateThumbprint

    Start-Sleep -Seconds 30
Write-Output 'Connected to Azure'
    }
    catch {
        Write-Output 'Unable to connect to Azure'
    }
}
We will have one variable set to the current date to compare if the Sandbox Resource Group has expired.
$dateRan = Get-DateThen we will want to retrieve a list of all of our Sandbox Resource Groups to see if any have expired.
$resourceGroups = Get-AzResourceGroup -Tag @{'environment'='Sandbox'} | Select -Property ResourceGroupName, TagsIn this example we are filtering just on the environment tag that was set when creating. This is arbitrary and used to help filter the results set.
Now we want to loop through all the Resource Group objects our query returned in the $resourceGroups variable and determine if the job’s run date is greater than the expiration date. If so, then delete the Resource Group.
 foreach ($resourceGroup in $resourceGroups)
    {
      $resourceGroupDestroyBy = [DateTime]$resourceGroup.Tags['DestroyBy']

      if ($dateRan.Date -gt $resourceGroupDestroyBy.Date){
      Write-Output 'Try to delete' $resourceGroup.ResourceGroupName
      try {
      Remove-AzResourceGroup -Name $resourceGroup.ResourceGroupName -Force
      Write-Output 'Successfully deleted ' $resourceGroup.ResourceGroupName
      }
      catch{
       Write-Output 'Failed to delete' $resourceGroup.ResourceGroupName
      }
      }
-Force is being passed into the Remove-AzResourceGroup command. This will bypass the confirmation prompt for deleting the Resource Group.
The end result:

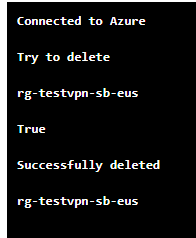
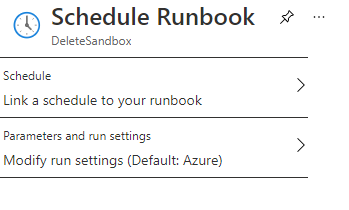
Ta-da! The last step in the process is to schedule the Runbook for execution at a set cadence.
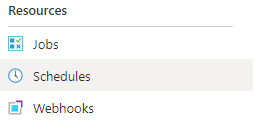
On the Runbook screen select “Schedules”

We will then select “Link a schedule to your runbook”, most likely we will then need to create a new schedule if you haven’t created any previously.

Fill out the schedule with the necessary information:


This schedule is agnostic of our Runbook. We can have multiple Runbooks configured to the same schedule. Also, the “Starts” field is when the schedule will first kick off. In our case it will first kick off at 2:11 Eastern US on 3/1/21 and then run once a day from then on.
The end result:


And we should be good to go!
Follow Ups
Some additional options I’ve done with this process is configuring the Delete Sandbox Resources Runbook to send out an email via Send Grid if the expiration is coming up in x amount of days so the developer is aware of it.
Also, if using Terraform check out this blog on how to deploy Azure Automation Runbooks via Terraform.
#AzureSpringClean
This post is part of 2021’s Azure Spring Clean Community Event. Feel free to share on social media/professional networks with the #AzureSpringClean
Code
CreateSandbox
param
(
  [Parameter (Mandatory= $true)]
  [String] $resourceGroupName
)

$connection = Get-AutomationConnection -Name AzureRunAsConnection
$logonAttempt = 0
while(!($connectionResult) -and ($logonAttempt -le 10))
{
    try{
    $LogonAttempt++
    # Logging in to Azure...
    $connectionResult = Connect-AzAccount `
                            -ServicePrincipal `
                            -Tenant $connection.TenantID `
                            -ApplicationId $connection.ApplicationID `
                            -CertificateThumbprint $connection.CertificateThumbprint

    Start-Sleep -Seconds 30
Write-Output 'Connected to Azure'
    }
    catch {
        Write-Output 'Unable to connect to Azure'
    }
}


$destroyByDate = (Get-Date).AddDays(7).ToString('MM-dd-yyyy')
$formatedrgName = "rg-$resourceGroupName-sb-eus"
$automationAccountResourceGroupName = "AUTOMATION_ACCOUNT_RESOURCE_GROUP_NAME"
$jobId = $PsPrivateMetadata.JobId.Guid
# Get jobs created in last 30 minutes
$StartTime = (Get-Date).AddMinutes(-30)

$JobInfo = @{}
$TimeoutLoop = 0
While ((-Not $requestedBy) -and ($TimeoutLoop -lt 8) ) {
    $TimeoutLoop++
    $JobAcvitityLogs = Get-AzLog -ResourceGroupName $automationAccountResourceGroupName -StartTime $StartTime `
    | Where-Object {$_.Authorization.Action -eq "Microsoft.Automation/automationAccounts/jobs/write"}

    # Find caller for job
    foreach ($Log in $JobAcvitityLogs)
    {
        # Get job resource
        $JobResource = Get-AzResource -ResourceId $Log.ResourceId
        if ($JobResource.Properties.jobId -eq $jobId)
        {

                $requestedBy = $log.Caller
                break
        }
    }
    if ($JobInfo.Count -eq 0)
    {
        Start-Sleep 30
    }
}
$tags = @{"Customer"="AzureSpringClean";"DestroyBy"=$destroyByDate; "RequestedBy" = $requestedBy; "Environment" = "Sandbox"}
New-AzResourceGroup -Name $formatedrgName -Location "East US" -Tag $tags -Force
while (($CheckResourceGroupExists -le 5) -and ( -Not $NotPresent))
{
try{
    $NotPresent =$null
    $CheckResourceGroupExists ++

Write-Output "Start to check if Resource group '$($formatedrgName)' exists..."
$newResourceGroup = Get-AzResourceGroup -Name $formatedrgName -ErrorVariable NotPresent -ErrorAction SilentlyContinue
if ($NotPresent) {
    Write-Output "Resource group with name '$($formatedrgName)' does not exist."
    Start-Sleep -Seconds 30

} else {
    Write-Output "Found Resource group with name '$($formatedrgName)'."
    $NotPresent = "false"
}
}
catch {
        Write-Output 'Unable to Locate Resource Group'
    }
}

while(!($connectionResultAD) -and ($logonAttemptAD -le 10))
{
    try{
    $LogonAttemptAD++
    # Logging in to Azure AD...
    $connectionResultAD = Connect-AzureAD `
                            -Tenant $connection.TenantID `
                            -ApplicationId $connection.ApplicationID `
                            -CertificateThumbprint $connection.CertificateThumbprint `
                            -ErrorAction Stop

    Start-Sleep -Seconds 30
Write-Output 'Connected to Azure AD'
    }
    catch {
        $_.Exception.Message
        Write-Output 'Unable to connect to Azure AD'
    }
}
if ($NotPresent = "false"){
    Write-Output 'Attempting to Assign Permissions'
    try{
      Write-Output "Attempt to get Object ID"
      $requestedByADObject = Get-AzureADUser -ObjectId $requestedBy -ErrorAction Stop
      Write-Output $requestedByADObject
      New-AzRoleAssignment -ResourceGroupName $formatedrgName -ObjectId $requestedByADObject.ObjectId -RoleDefinitionName Owner
      Write-Output 'Successfully Assigned Permissions'
    }
    catch{
        $_.Exception.Message
        Write-Output 'Unable to Assign Permissions'
        break
    }
}
DeleteSandboxResources
$dateRan = Get-Date
$i = 0

$connection = Get-AutomationConnection -Name AzureRunAsConnection
$logonAttempt = 0
while(!($connectionResult) -and ($logonAttempt -le 10))
{
    try{
    $LogonAttempt++
    # Logging in to Azure...
    $connectionResult = Connect-AzAccount `
                            -ServicePrincipal `
                            -Tenant $connection.TenantID `
                            -ApplicationId $connection.ApplicationID `
                            -CertificateThumbprint $connection.CertificateThumbprint

    Start-Sleep -Seconds 30
Write-Output 'Connected to Azure'
    }
    catch {
        Write-Output 'Unable to connect to Azure'
    }
}


$resourceGroups = Get-AzResourceGroup -Tag @{'environment'='Sandbox'} | Select -Property ResourceGroupName, Tags

    foreach ($resourceGroup in $resourceGroups)
    {
      $resourceGroupDestroyBy = [DateTime]$resourceGroup.Tags['DestroyBy']
      $resourceGroupContact = $resourceGroup.Tags['RequestedBy']
      if ($dateRan.Date -gt $resourceGroupDestroyBy.Date){
      Write-Output 'Try to delete' $resourceGroup.ResourceGroupName
      try {
      Remove-AzResourceGroup -Name $resourceGroup.ResourceGroupName -Force
      Write-Output 'Successfully deleted ' $resourceGroup.ResourceGroupName
      }
      catch{
       Write-Output 'Failed to delete' $resourceGroup.ResourceGroupName
      }
      }