Intro: CI/CD Pipelines for Bicep
Disclaimer: This is more technical than what I like putting in a blog post. I don’t know a way around it as feel like it’s important information to get out there in the community. This is the next step in my YAML Deployment Pipelines presentation which was the evolution of Leveraging YAML Pipelines the New Deployment Architecture which was a follow up to my original Introduction to the Joy of Azure DevOps MultiStage YAML Pipelines. Might be worth diving into these to better understand my approach on architecting pipelines in Azure DevOps.
Background
I’ve noticed a lot of folks will setup a minimum of two Azure DevOps (ADO) multi-stage pipelines. They will configure one to handle just Continuous Integration (CI) into the master branch and a separate branch for deployments. I challenge if this really should be done?
By doing this there is a risk that your CI and CD pipeline don’t run the same steps as part of the build process. i.e. Someone would have to maintain two pipeline definitions.
With conditions this doesn’t have to be the case. For this example, I will focus on using Bicep with a Function App to illustrate how this could be accomplished. Additionally, will focus on one way to leverage Azure DevOps CI Pipelines for Bicep with Templates
One additional thing that seems to be lacking in a lot of walkthroughs is validating Bicep changes as part of the build stage. For those more familiar this would be the equivalent to Terraform’s plan operation.
In the next post will focuse more on the CD components.
Steps for CI
First need to identify the tasks required for the CI process. For a Bicep deployment and the corresponding code deployment for a function app:
- Az CLI What-If
- Set .NET SDK version (sometimes required for newest version)
- .NET Build Function App Code
- .NET Test Function App Code
- .NET Publish Function App
- Publish Pipeline Artifact for Bicep Files
- Publish Pipeline Artifact for Function App Code
This may seem like a lot to run for every PR request as well as for each pipeline deployment; however, stop and think what’s the downside? Really there isn’t any if we are going to reuse the same pipeline for both CI/CD. Additionally, if cost of the Pipeline artifact storage is of concern check out Microsoft’s documentation on the PublishPipelineArtifact task

So, besides the minutes used to build your application there isn’t much of a downside. Even the time can be negated with smart planning on breaking these steps into parallel jobs, which we can walk through.
The one downside I have come across is pipeline retention. This may have to be adjusted since the amount of times the pipeline will execute should at least double (1X for CI, 1X for CD).
Az CLI What-If
Let’s jump into this one. Reason why one would run a what-if command here is to validate the Infrastructure as Code (IaC) changes the code will make prior to deployment. This is key to the CI component and something an individual approving PRs would be sure to review prior to approving. For those wanting more information on the what-if command feel free to check out the documentation. There are more options, for now let’s keep it basic.
The YAML for this will look different as I prefer to leverage templates wherever I can and if you look closely at the what-if command it is almost exactly the same as the deploy command (and for that matter the validate command as well). The main difference being the actual command names: what-if vs create vs validate. Thus, I made a generic template to handle all three and receives the command as a parameter, any additional PowerShell parameters can be passed through as well as a string.
azcli_sub_deploy_task.yml
parameters:
- name: azureSubscriptionName
  type: string
  default: ''
- name: location
  type: string
  default: 'CentralUS'
- name: templateFileName
  type: string
  default: ''
- name: parametersFileName
  type: string
  default: ''
- name: command
  type: string
  default: validate
- name: additionalArguments
  type: string
  default: ''
- name: deploymentName
  type: string
  default: 'azureADOCLIDeployment'

steps:
- task: AzureCLI@2
  displayName: '${{ parameters.command }} bicep'
  inputs:
    azureSubscription: ${{ parameters.azureSubscriptionName }}
    scriptType: 'pscore'
    scriptLocation: 'inlineScript'
    inlineScript: 'az deployment sub ${{ parameters.command }} --location ${{ parameters.location }} --name ${{ parameters.deploymentName }} --template-file ${{parameters.templateFileName}} --parameters ${{parameters.parametersFileName}} ${{ parameters.additionalArguments }}'
Key things to note here are the region location and azureSubscriptionName are being passed in as parameters. This is really forgotten in the CI piece at times as we ideally want to run a what-if command across all planned instances of deployment across all environments. Thus, an approver can call out “Hey, that infrastructure change you thought woudl just impact dev, would impact production”
Now there might be a few folks out there that will say the what-if command has a bug when looking at dependent resources. This is true; however, at the time of this writing the root cause had been identified and should be deployed any day.
Set .NET SDK Version
When new versions of the .NET SDK are released, they aren’t always available to the build agent. As such sometimes need to set this.
dotnet_sdk_task.ymlparameters:
- name: sdkVersion
type: string
default: '3.1.x'
steps:
- task: UseDotNet@2
displayName: 'Use .NET SDK v${{ parameters.sdkVersion }}'
inputs:
packageType: 'sdk'
version: ${{ parameters.sdkVersion }}
includePreviewVersions: true.NET Build and Test
I’m grouping these two tasks together because again….they are both identical CLI commands minus the command : build vs test
dontnetcore_cli_task.ymlparameters:
command: ''
projectPath: ''
arguments: ''
steps:
- task: DotNetCoreCLI@2
displayName: 'dotnet ${{ parameters.command}}'
inputs:
command: ${{ parameters.command}}
projects: ${{ parameters.projectPath }}
argumets: ${{ parameters.arguments}}.NET Publish
This one can’t be the same as the .NET Build and Test template as it requires additional parameters per the DotNetCoreCLI documentation.
dotnetcore_publish_task.ymlparameters:
projectPath: ''
arguments: ''
publishWebProjects: false
zipAfterPublish: true
steps:
- task: DotNetCoreCLI@2
displayName: 'dotnet publish'
inputs:
command: publish
publishWebProjects: ${{ parameters.publishWebProjects }}
projects: ${{parameters.projectPath}}
arguments: ${{parameters.arguments}}
zipAfterPublish: ${{ parameters.zipAfterPublish }}Publish Pipeline Artifacts
Again, we will use this trick of templating tasks as we will want separate artifacts for the app code and the infrastructure. This is cleaner and additionally speeds up the process since the jobs can be ran in parallel without dependencies.
ado_publish_pipeline_artifact_task.ymlparameters:
targetPath: ''
artifactName: ''
steps:
- task: PublishPipelineArtifact@1
inputs:
targetPath: ${{parameters.targetPath}}
artifact: ${{parameters.artifactName}}Why Template this way?
Honestly, I got tired of copy and pasting what felt like the same task continuously and decided to take a closer look at what the differences actually were. By templating these tasks, even to what some might perceive as a basic level, we can ensure not only the same task is being used but can also easily control/maintain the version of the ADO tasks our pipelines could be leveraging. There is a fine balance between over templating and simplifying.
Don’t believe me? A client of ours had over 20 Terraform pipelines. We identified the need to switch out the Terraform build/apply tasks. We got it working for one pipeline and proceeded to simultaneously updated all the pipelines using the task describe in my Azure DevOps Terraform Task post in under thirty minutes. This was made possible as all the pipelines relied on a shared repository of template tasks. We just updated the tasks and that was it.
Jobs for CI
There is some careful thought on this one. The tasks could simply be thrown into one job and call it a day; however, this does not leverage any of the capabilities Azure DevOps has for running things in parallel.
In this particular instance let’s take a first pass and group the tasks by Infrastructure or Application based:
- Infrastructure
- Az CLI What-If
- Publish Pipeline Artifact for Bicep Files
- Application:
- .NET Build Function App Code
- .NET Test Function App Code
- .NET Publish Function App Code
- Publish Pipeline Artifact for Function App Code
This is a good starting point to identify two jobs. Let’s look closer though.
With Bicep files they compile to ARM files and are sent to the Azure Resource Manager. We aren’t doing any of that as part of the build process so there really isn’t any need to require the Az CLI What-If command to be dependent on the Pipeline Artifact or vice versa, so let’s break that out as two separate jobs to really maximize Parnellism.
We can’t say the same for the Application as we would never want to publish an app that doesn’t build nor if it fails the designed tests we shouldn’t generate a pipeline artifact which could be used for a deployment. Thus, those tasks are dependent on each other.
So the new list of jobs could look like:
- Bicep What-If
- Bicep Publish Pipeline Artifact
- Build/Test/Publish/Publish Pipeline Artifact
Something to note here….since we split the What-If into its own job this also means we can scale this out to as many Azure Subscriptions and regions as needed. All of which would run in parallel which makes sense. This really looks cool when you start scaling out.
Bicep What-If
bicep_whatif_env_job.ymlparameters:
- name: environmentName
type: string
- name: templateFile
type: string
- name: templateDirectory
type: string
- name: serviceName
type: string
- name: regionAbrv
type: string
jobs:
- job: whatif_${{ parameters.serviceName }}_${{ parameters.environmentName }}_${{ parameters.regionAbrv }}
variables:
- template: ../variables/${{ parameters.environmentName }}.azure.yml
steps:
- template: ../tasks/azcli_sub_deploy_task.yml
parameters:
azureSubscriptionName: ${{ variables.AzureSubscriptionServiceConnectionName}}
templateFileName: ${{ parameters.templateDirectory }}/${{ parameters.templateFile }}.bicep
parametersFileName: '${{ parameters.templateDirectory }}/parameters/${{ parameters.environmentName }}.${{ parameters.regionAbrv }}.parameters.json'
command: 'what-if'
additionalArguments: '--out yamlc'
Biggest call outs here is the job name. ADO can’t have the same job name appear twice so need to adjust for this with some magic around concatenation of a project/service name, environment, and region name. This methodology should fall in line with best practices in terms of resource group deployment strategy.
Additionally, if you looked over you may have noticed I created an envrionmentName.azure.yml file. This is also key as it will let us define certain values once and reuse multiple times.
Notice the command what-if is being passed into the task. This makes sense as at this stage we don’t want to deploy, just validate the changes our bicep file is going to make in the corresponding environment. When we move to deployment then this command value would be create
Bicep Publish Pipeline Artifact
This is the easiest one. We just want to copy the static Bicep files and make them an artifact of the pipeline. If done correctly then there shouldn’t be any extra magic needed to deploy these other than passing in the blanks such as parameters, azure subscription, and location info.
bicep_publish_job.ymlparameters:
targetPath: 'bicep'
artifactName: 'bicep'
jobs:
- job: Publish_${{ parameters.artifactName }}
steps:
- template: ../tasks/ado_publish_pipeline_artifact_task.yml
parameters:
targetPath: ${{ parameters.targetPath }}
artifactName: ${{ parameters.artifactName }}Build/Test/Publish/Publish Pipeline Artifact
This is a more intimidating one; however, that’s because we said these tasks are dependent on one another and as such should run in sequential order.
dotnetcore_build_publish_job.ymlparameters:
solutionName: ''
buildConfiguration: 'Release'
projectName: ''
dotnetTest: true
zipAfterPublish: true
publishWebProject: true
sdkVersion: ''
jobs:
- job: build_publish_${{parameters.projectName}}
variables:
projectName: ${{replace(parameters.projectName,'_','.')}}
${{ if eq(parameters.solutionName, '')}} :
projectPath: '$(Build.SourcesDirectory)/src/${{ variables.projectName }}/**/*.csproj'
testProjectPath: '$(Build.SourcesDirectory)/src/${{ variables.projectName }}.Tests/**/*.csproj'
${{ else }} :
projectPath: '$(Build.SourcesDirectory)/src/${{ parameters.solutionName }}/${{ variables.projectName }}/**/*.csproj'
testProjectPath: '$(Build.SourcesDirectory)/src/${{ parameters.solutionName }}/${{ variables.projectName }}.Tests/**/*.csproj'
dropLocation: 'drop/${{ parameters.projectName }}'
steps:
- template: ../tasks/dotnet_sdk_task.yml
parameters:
sdkVersion: ${{ parameters.sdkVersion }}
- template: ../tasks/dotnetcore_cli_task.yml
parameters:
command: 'build'
projectPath: ${{ variables.projectPath }}
arguments: '--configuration ${{ parameters.buildConfiguration }}'
- ${{ if eq(parameters.dotnetTest, true) }}:
- template: ../tasks/dotnetcore_cli_task.yml
parameters:
command: 'test'
projectPath: ${{ variables.testProjectPath }}
arguments: '--configuration ${{ parameters.buildConfiguration }} --collect "Code coverage"'
- template: ../tasks/dotnetcore_publish_task.yml
parameters:
zipAfterPublish: ${{ parameters.zipAfterPublish}}
arguments: '--configuration ${{ parameters.buildConfiguration }} --output ${{variables.dropLocation}}'
projectPath: ${{ variables.projectPath}}
publishWebProject: ${{ parameters.publishWebProject }}
- template: ../tasks/ado_publish_pipeline_task.yml
parameters:
artifactName: ${{ parameters.projectName }}
targetPath: ${{variables.dropLocation}}
Stages
All these jobs belong to the same stage. In this case the build stage. This can be where things get really cool and really challenging. It’s easy to do this for one environment, one region, and one function app per solution. What if we wanted to easily fan this out? How could we do this within the confines of YAML and ADO. Let me show the code and we will walk through:
bicep_dotnet_build_stage.ymlparameters:
projectNamesConfigurations:
- projectName: ''
publishWebProject: true
dotnetTest: true
solutionName: ''
environmentObjects:
- environmentName: 'dev'
regionAbrvs: ['cus']
templateFile: ''
templateDirectory: 'bicep'
serviceName: ''
sdkVersion: ''
stages:
- stage: '${{ parameters.serviceName }}_build'
variables:
solutionPath: '$(Build.SourcesDirectory)/${{ parameters.solutionName }}/'
jobs:
- template: ../jobs/bicep_publish_job.yml@YAMLTemplates
- ${{ each environmentObject in parameters.environmentObjects }} :
- ${{ each regionAbrv in environmentObject.regionAbrvs }} :
- template: ../jobs/bicep_whatif_env_job.yml@templates
parameters:
environmentName: ${{ environmentObject.environmentName }}
templateFile: ${{ parameters.templateFile }}
templateDirectory: ${{ parameters.templateDirectory }}
serviceName: ${{ parameters.serviceName }}
regionAbrv: ${{ regionAbrv }}
- ${{ each projectNamesConfiguration in parameters.projectNamesConfigurations }} :
- template: ../jobs/dotnetcore_build_publish_job.yml@YAMLTemplates
parameters:
solutionName: ${{ parameters.solutionName }}
projectName: ${{replace(projectNamesConfiguration.projectName,'.','_')}}
publishWebProject: ${{ projectNamesConfiguration.publishWebProject }}
sdkVersion: ${{ parameters.sdkVersion }}
dotNetTest: ${{ projectNamesConfiguration.dotnetTest }}
It’s important to understand YAML objects. Objects can be built to contain a series of necessary information. In this case primarily what regions are defined per environment and properties that could vary between projects in a given solution.
The next thing to understand here is the each keyword in ADO. This allows us to dynamically create instances of the job templates we defined above.
Focusing on the Bicep piece. We need to loop through first for each environmentObject that will be passed in, then within that object loop through each regionAbrvs being passed in so we can create those jobs on the fly.
The Application component would loop through each project and its associated configuration defined within the object.
Pipeline Definition
So now that there are templates for tasks, jobs, and stages how do we use them? First, I wrap my actual pipeline in a template…what I mean is the pipeline defined as a pipeline in ADO is a shell that calls a template specific to the pipeline I am running. The reason for this is to quickly change triggers, agent OS, schedules, etc..; however, still have them all running the same pipeline. Side bonus if doing something like a micro service architecture could have a master pipeline call all the templates.
Pipeline Template
bicep.DotNetCore.Web-template.yml parameters:
- name: environmentObjects
type: object
default:
- environmentName: 'dev'
dependsOn: ''
regionAbrvs: ['cus','wus']
- environmentName: 'qa'
dependsOn: ''
regionAbrvs: ['cus','wus']
- name: templateFile
type: string
default: 'main'
- name: serviceName
type: string
default: 'example'
- name: projectNamesConfigurations
type: object
default:
- projectName: 'Function.Vehicle'
publishWebProject: false
azureServiceName: 'vehicle'
dotnetTest: false
deployToAPIM: true
- name: sdkVersion
type: string
default: '3.1.x'
stages:
- template: stages/bicep_dotnet_build_stage.yml@YAMLTemplates
parameters:
environmentObjects: ${{ parameters.environmentObjects }}
templateFile: ${{ parameters.templateFile }}
serviceName: ${{ parameters.serviceName }}
projectNamesConfigurations: ${{ parameters.projectNamesConfigurations}}
sdkVersion: ${{parameters.sdkVersion}}
This is where the objects talked about earlier really come into play.
Pipeline Definition
bicep.DotNetCore.Web-pipeline.ymltrigger:
branches:
include:
- main
pool:
vmImage: 'windows-latest'
resources:
repositories:
- repository: YAMLTemplates
type: git
name: Examples/YAMLTemplates
stages:
- template: bicep.DotNetCore.Web-template.ymlReally not much to this. Call out the dependency on what the YAML Templates are stored, set vmImage, and triggers.
CI/CD Trigger
Weren’t you going to tell me about how to reuse the same pipeline for CI and CD? After all this and you are still there the process to do this is actually quite simple. We combine a few things within ADO to determine if deployment stages need to be used or not.
The first is looking at the ADO predefined variables and locate the Build.SourceBranch value. For simplicity assume trunk based so main in this case; however, other methodologies work.
We also are going to want this pipeline to execute when a PR is submitting, the best way to do this is via a branch policy. If new to branch policies feel free to brush up.
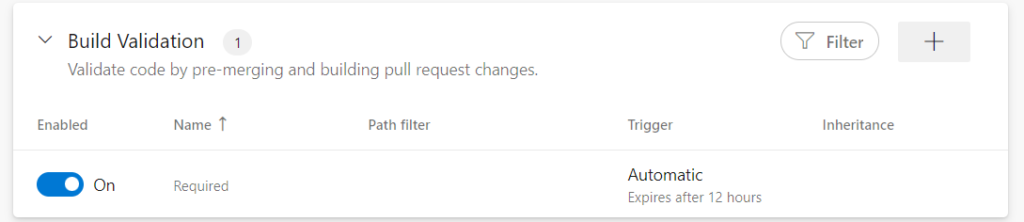
This ensures the pipeline will run when a PR is submitted via validation. So how do we tell the pipeline not to deploy?
This is where the Build.SourceBranch value comes into play. If this value is, in our case, the trunk (main) then we want to run the deployment stages, if not then we don’t even want them to load. This is key. I’ve seen some folks write about skipping the stages; however, I always prefer not even loading. It’s less risk and provides a cleaner UI experience (I’ll show you).
So how can we have the stages be skipped? By inserting an if condition before loading the deployment stages.
- ${{ if eq(variables['Build.SourceBranch'], 'refs/heads/main')}} :
  - ${{ each environmentObject in parameters.environmentObjects }} :
    - template: stages/bicep_deploy_stage.yml@YAMLTemplates
By doing this loop to even read the deployment stages is not executed unless the Build.SourceBranch is main. From a UI experience it would look something like:
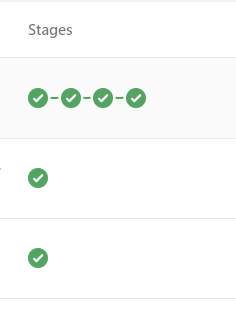
This allows one to easily tell which pipeline was meant to be part of a CI or a CD process.
Conclusion
So, this is a lot, and we only talked about CI, not even deployment. That is something I may talk next time; however, wanted this to be an introduction into a way to leverage Azure DevOps CI Pipelines for Bicep with Templates feel free to reach out and provide any feedback!
Discover more from John Folberth
Subscribe to get the latest posts sent to your email.