Azure Deployment Environments – Creating a Developer Sandbox
Introduction
Azure Deployment Environments provides the ability for development teams to self service and create their own environments in Azure. This post will walkthrough the scenario where a developer that has only Reader access to the portal can create a Resource Group on demand with Contributor and User Access Administrator leveraging Deployment Environments. This would allow the development team to create and experiment in Azure in a controlled environment. This Resource Group can be monitored and tracked by the operations team.
If new to Dev Center please check out my post on Introduction to Deployment Environments Components. We are going to assume you already have a Dev Center configured and has the ability to access a repository.
Template Design
This a fun one. Since our ADE will create a resource group as part of the deployment of resources, we just need an empty ARM template. Alternatively a completly empty Bicep file will generate an empty ARM Template, at the time of this writing only ARM is supported for ADEs.
ARM Template
Here is the ARM Template.
{
  "$schema": "https://schema.management.azure.com/schemas/2019-04-01/deploymentTemplate.json#",
  "contentVersion": "1.0.0.0",
  "resources": []
}
Manifest File
The Manifest file will contain the parameters we need to spin up the ADE. In this case we do not need parameters; however, we will need to tell the ADE certain items such as the template name, version, location of the ARM template, etc.
# yaml-language-server: $schema=https://github.com/Azure/deployment-environments/releases/download/2022-11-11-preview/manifest.schema.json
name: Sandbox
version: 1.0.0
summary: Empty sandbox environment
description: Deploys an empty sandbox environment
runner: ARM
templatePath: azuredeploy.json
Project Configuration
For us to grant the elevated permissions to developers creating an ADE with this template we will need to ensure access is correctly provisioned.
First we will want to ensure that any developers who will want to spin up this template has access to the Project. This is accomplished by selecting the “Access control (IAM)” blade of the Dev Center. After this will need to add the desired users as a Deployment Environment User. This will let the user gain access to the Project and the associated Environment Types within the Project.
After this we need to ensure the desired Environment Type will provision the user the appropriate roles once the ADE has been created. To accomplish this we select the Project then go to Environment Types and ensure the “Environment creator role(s)” are appropriately filled out. For this example it is User Access Administrator and Contributor.
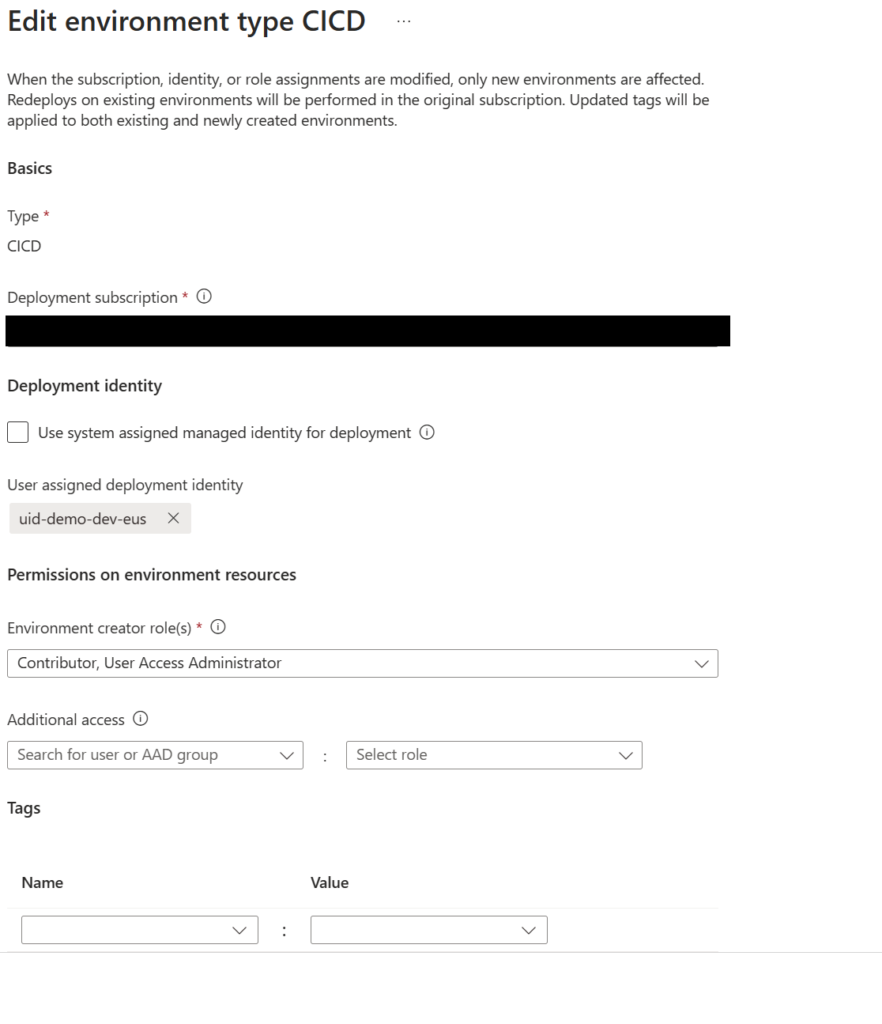
Note here we can also create any additional access for additional users or groups.
End Result
After loading this Catalog into the Dev Center we should now have the ability create and environment and Select the “Sandbox” environment definition like below:
If successful we should be able to see the resource group created with the naming convention of <projectName>-<environmentName>
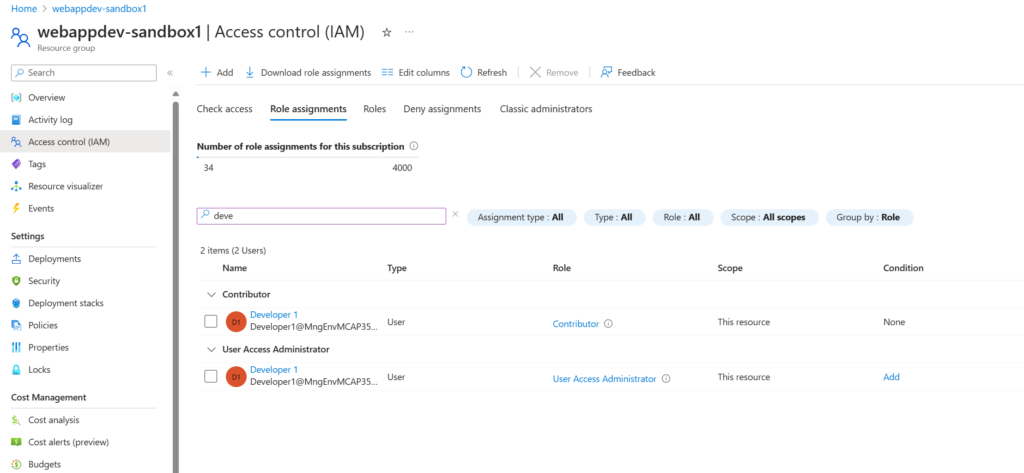
We can also see now that the user, in this case Developer 1, now has Contributor and User Access Administrator scoped to the Resource Group.
For a complete copy of the source code for the Catalog you can find it on the product group’s GitHub.
Conclusion
In this walkthrough we were able to create and provision appropriate access on demand via Azure Deployment Environments. This is just one such use case. I plan to have a follow up blog outlining how to provision an application infrastructure to allow for dedicated temporary developer environments and how to incorporate ADEs into our CI process to accommodate testing.
Discover more from John Folberth
Subscribe to get the latest posts sent to your email.