Leveraging YAML Pipelines: The New Deployment Architecture
Update: Check out my presentation to the Omaha Azure User Group to see these action!
Update 2: Check out my GitHub TheYAMLPipelineOne for examples!
For those unaware there has been an increasing directional shift from Microsoft to move away from using Classic Build Pipelines and Classic Releases Pipelines to one consolidated experience called Pipelines, or YAML Pipelines to better clarify the difference between Classic Pipelines and the new experience.
This blog will touch on what YAML Pipelines are, the importance of them, and most importantly a strategy around architecting pipelines to be optimized for reuse
Case for YAML Pipelines
Exhibit A being the Azure DevOps roadmap. Notice there is just Pipelines and nothing about releases. Next look at this update to indicate how Microsoft is planning to make the conversion to YAML Pipelines easier. The case is clear YAML is here, and here to stay.
For clarity the technical terms for the previous build and release process has been renamed to Classic Build Pipelines and Classic Release Pipelines. To keep things simple this blog will reference each as classic build and classic release and not to be confused with the new integrated YAML Pipeline experience.
What this shift means is that there no longer is a separate build and a separate release process. Rather than define the build pipeline via YAML and then turn around and define a separate release process through a User Interface there is just one YAML pipeline that will cover both a build and a release. In addition to one place for both there are a few other benefits:
- Parallelism is easy
- Our build and releases ARE CODE
- This means they adhere to our code strategy meaning:
- Reviewers required
- Branching strategy
- This means they adhere to our code strategy meaning:
- TEMPLATES!! ….not task groups
Importance of a DevOps Architecture
I’ve been playing with these new YAML Pipelines for several months after they went GA in April 2020 . I’ll try to call out some of my learnings and demo but a takeaway is clear that as developers, DevOps engineers, cloud engineers, project managers, testers etc we need to understand the need to stop evaluating our deployment processes as a necessary evil but rather an architecture endeavor. If we can successfully implement an architecture pattern that incorporates flexibility and reusability it will make everyone’s lives easier.
The key to architecting Azure DevOps YAML Pipelines and templates is to first remove the notion that each release is scripted and tailored to a specific application. There is a need to evaluate how to write steps, tasks, jobs that can be easily repeatable and transposable.
The goal and end game for this type of architecture pattern is to cut down on the number of times a task, job, stage, is defined. If it can be defined in one place it can be ensured that each build and deployment is being carried out the same way. It would be independent of an application, repository, or project. This type of pattern can pay dividends in larger organizations who have set standards or in environments where a micro-services architecture has been implemented. Heres a previous post that touches on how to implement YAML Pipelines in a Micro-Service Architecture
A DevOps Architecture
The first decision within a DevOps Architecture is where to store the shared and reusable pieces leveraged by the pipelines. YAML templates support cross repository use thus providing a centralized repository that can be leveraged across projects.
The concept to keep in mind when designing these templates is to ensure they are as agnostic of the calling source as possible. This will optimize the ability for reuse.
The best way of doing this is by passing parameters into the template. With this specific case parameters may be the project path that is being built, an environment being passed in, etc…
It is perhaps easiest to look at this process from the ground up. What this means is first look at individual tasks or a build/release across projects and we should see multiple overlaps. For example, if we are doing Azure Resource Manager (ARM) Templates we will consistently be reusing the Azure Resource Group Deployment task. If we are doing items in .Net Core then we will be potentially reusing the DotNetCoreCLI task.
In regards to the DotNetCoreCLI task the main difference might be the commands and arguments being passed into it. This execution occurs at the task level so if the goal is to reuse this task as much as possible then the specific parameters need to be account for. Here’s an example of what this might look like:
parameters:
  command: 'build'
  projectPath: ''
  arguments: ''

steps:
  - task: DotNetCoreCLI@2
    displayName: 'dotnet ${{ parameters.command }}'
    inputs:
      command: ${{ parameters.command }}
      projects: ${{ parameters.projectPath }}
      arguments: ${{ parameters.arguments }}
Take note here that command, projectPath, and arguments are defined as the parameters. The command parameter has been defaulted to build as the assumption is this task will be used the majority of the time to build; however, it can be overwritten. The outcome by doing this is one less parameter to pass in if we are using this task to build the project.
Some of the pros of being able to genericize the task is an improved path for maintenance as well as consistency on how the task is being leveraged. The example above is using version 2 of the DotNetCoreCLI task. Theoretically if version 3 is introduced next week the update just needs to be in this one place….and BOOM every Azure DevOps Pipeline that is consuming this task has been updated, BY CHANGING ONE CHARACTER. This also helps to ensure consistency that everything is using the same version rather than having each project define their own implementation of these DevOps tasks. Now this will lead to maintenance consideration which will be covered in a later blog post.
Now that the basic task has been generalized the next step would be to call this same task from a job.
parameters:
 buildConfiguration: 'Release'
 projectPath: ''
jobs:
- job: Build
  steps:
    - template: ../Tasks/dotnetcorecli.yml
      parameters:
        command: 'restore'
        projectPath: ${{ parameters.projectPath }}

    - template: ../Tasks/dotnetcorecli.yml
      parameters:
        projectPath: ${{ parameters.projectPath }}
        arguments: '--configuration ${{ parameters.buildConfiguration }}'
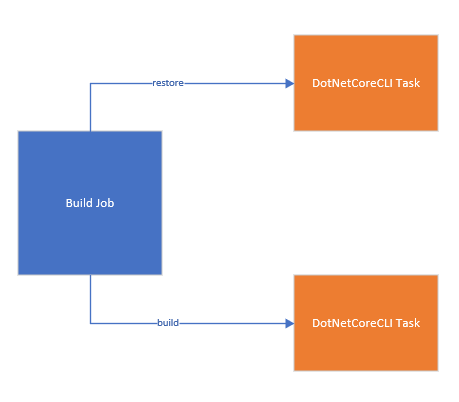
At the job level the same task template is being reused and passing in different commands and different arguments. Notice that each task doesn’t have to pass in the same arguments as there have been defaults already defined in the task template.
Let’s take a visual of what this architecture looks at now
Scaling Out Jobs
In this job two operations that usually are grouped together (dotnet restore, dotnet build) have been encapsulated by a job in such a way any project can call these tasks. The next step in this process would be to repeat this process with jobs and stages.
When build/deploying a .NET Core application in Azure the need may arise to deploy/redeploy the infrastructure associated with the app.
This approach could consist of two jobs. One job to deploy the infrastructure and one job to deploy the code. Each job will call their respective tasks. Let’s take that a step up and realize that the jobs will always run together. We wouldn’t want to deploy the infrastructure without the code nor the code without the infrastructure as the assumption should be, we don’t know what does and doesn’t exists.
Thus, these jobs would be wrapped in a stage so it would look like: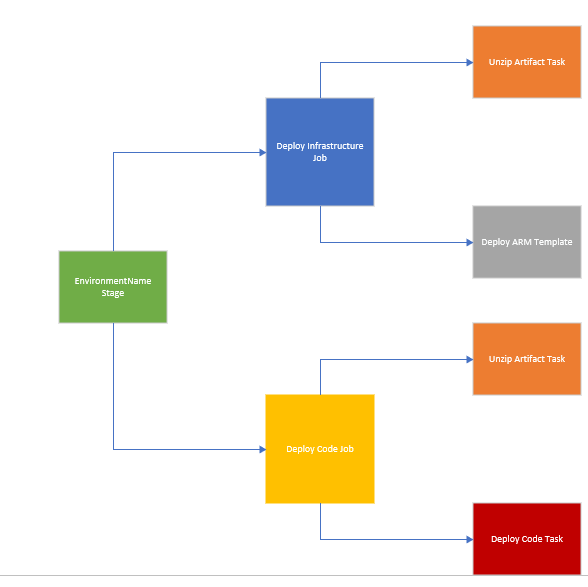
Here the Unzip Artifact task is being re used across jobs. So, the EnvironmentName Stage will call the Deploy Infrastructure Job template and the Deploy Code Job template. Thus, these will be isolated from each other and each one could be reused separately and/or together. Now it’s important to call out from a reuse perspective that items that need to be specific to the project or application like project name, folder path, etc… will need to be passed in from the stage level to the jobs
Applying Architecture to Stages
Since in this example the infrastructure and code are being defined together it makes sense for the stage to call each template. Just ensure the Deploy Code template has the proper dependsOn with the Deploy Infrastructure job. If it doesn’t Azure DevOps will try to run these simultaneously which could error out on initial deployment. One possible code configuration might be:
- stage: Deploy_${{parameters.serviceName}}_${{parameters.environmentName}}
  jobs:
    - template: ../jobs/arm-deploy.yml@YAMLTemplates
      parameters:
          environmentName: ${{ parameters.environmentName }}
          serviceName: ${{ parameters.serviceName }}

    - template: ../jobs/code-deploy.yml@YAMLTemplates
      parameters:
          environmentName: ${{ parameters.environmentName }}
          destinationName: ${{ parameters.storageAccountPrefix }}${{ parameters.environmentName }}${{ parameters.serviceName }}stg
          sourcePath: ${{ parameters.sourcePathPrefix }}${{parameters.environmentName }}-${{parameters.serviceName}}/${{ parameters.sourcePathFolder }}
          serviceName: ${{ parameters.serviceName }}
          dependsOn: ['ARMDeploy${{ parameters.environmentName }}']
The arm-deploy.yml file will create a job named ‘ARMDeploydependsOn: ‘ARMDeploy${{ parameters.environmentName }} This can be scaled up and reused more by providing something like serviceName to the name. Thus, could run multiple deployment jobs from within the same stage.
At this point the deployment process for a specific environment has been created. The next step is to take this stage and make a template of it.
Something like:
  - template: stages/deploy.yml@YAMLTemplates
    parameters:
      serviceName: ${{ parameters.serviceName}}
      environmentName: ${{ environmentNames}}
      storageAccountPrefix: ${{ parameters.storageAccountPrefix }}
      sourcePathPrefix: ${{ parameters.sourcePathPrefix}}
      sourcePathFolder: ${{ parameters.sourcePathFolder}}
Now if this configuration needs to be leveraged for multiple environments one could copy and paste the above line 3 times, but what’s the fun in that? Wouldn’t it be easier if this can be looped through? This can be accomplished by first defining a YAML object to hold the environments like:
- name: environmentNames
  type: object
  default: ['dev', 'tst']
Then we’d need a loop to iterate through each object. This is possible though Iterative insertion
So the example may look like:
stages:
- ${{ each environmentNames in parameters.environmentNames }} :
  - template: stages/deploy.yml@YAMLTemplates
    parameters:
      serviceName: ${{ parameters.serviceName}}
      environmentName: ${{ environmentNames}}
      storageAccountPrefix: ${{ parameters.storageAccountPrefix }}
      sourcePathPrefix: ${{ parameters.sourcePathPrefix}}
      sourcePathFolder: ${{ parameters.sourcePathFolder}}
This will loop through each environment passing in the same information each time, minus the environmentName. Notice there is a difference that instead of ${{ parameters.evnrionmentName }} being used it is instead passing in ${{ envrionmentNames }}. The way this is declared has changed the scope. It is now referring to the each block of the code for scope
Folder Structure
If it helps one thing to look at when constructing the aforementioned shared repository is to start with the basics something like:
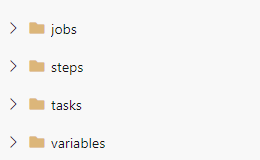
This covers every layer of the YAML Pipelines as well as the inclusion of variables which might be used when storing specific variables that might be reused across all projects that shouldn’t change. I’ve used this for certain information that pertains to the Azure Subscription.
What about CI Builds?
This post has covered how to build and deploy code via YAML Pipelines. So what about Continuus Integration Builds that may get trigged via branch policies? For those unfamiliar, a CI build may occur when a Pull Request has been initiated to ensure the code will still compile as well as potentially run any integration tests to ensure code quality before ever deploying.
This process CAN BE USED to achieve this. This is what is ideal, that the build part of the build and release pipeline is the exact same as the CI build. To achieve this the loop that was initiated for deploying the stages needs to have a check. The check should ensure that this Pipeline is executing against the ‘master/main’ branch of project if code is being deployed. If it isn’t then skip all the deployment stages and just do a build stage.
This can be easily accomplished by looking at what the source branch is via the Build.SourceBranch predefined variable.
There needs to be condition added to the loop:
stages:
- template: stages/dotnetcorebuild.yml@YAMLTemplates
  parameters:
    serviceName: ${{ parameters.serviceName }}
    environmentNames: ${{ parameters.environmentNames}}

- ${{ if eq(variables['Build.SourceBranch'], 'refs/heads/master')}} :
    - ${{ each environmentNames in parameters.environmentNames }} :
      - template: stages/deploy.yml@YAMLTemplates
        parameters:
          serviceName: ${{ parameters.serviceName}}
          environmentName: ${{ environmentNames}}
          storageAccountPrefix: ${{ parameters.storageAccountPrefix }}
          sourcePathPrefix: ${{ parameters.sourcePathPrefix}}
          sourcePathFolder: ${{ parameters.sourcePathFolder}}
This line ${{ if eq(variables['Build.SourceBranch'], 'refs/heads/master')}} is evaluated at compilation so the deployment stages will never load if the pipeline is being triggered by something other than the master branch. Pretty cool, right?
Conclusion
Azure DevOps YAML Pipelines provides the necessary technology to apply the CI/CD best practices to our releases. Defining releases and scaling them for usability is a different challenge. One that if approached with those concepts in mind can help scale out a new type of architecture that can be included in existing design practices.
Discover more from John Folberth
Subscribe to get the latest posts sent to your email.